Restriction Enzyme Cleaving Explained
You’ll need to understand the basic idea behind restriction enzymes to understand the simulation you’ll be writing, modifying, and running.
Restriction enzymes cut a strand of DNA at a specific location, the binding site, typically separating the DNA strand into two pieces. In the real chemical process a strand can be split into several pieces at multiple binding sites, we’ll simulate this by repeatedly dividing a strand.
Given a strand of DNA “aatccgaattcgtatc” and a restriction enzyme like EcoRI “gaattc“, the restriction enzyme locates each occurrence of its pattern in the DNA strand and divides the strand into two pieces at that point, leaving either blunt or sticky ends as described below. In the simulation there’s no difference between a blunt and sticky end, and we’ll use a single strand of DNA in the simulation rather than the double-helix/double-strand that’s found in the physical/real process.
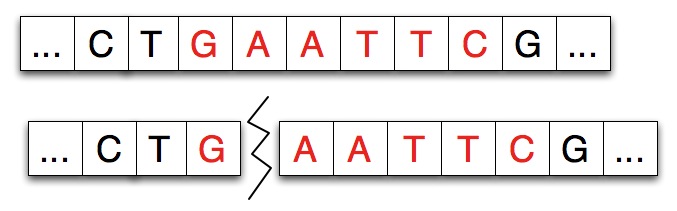
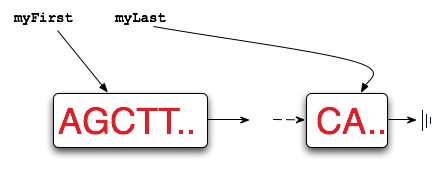
Restriction enzymes have two properties or features: the pattern of DNA that marks a site at which separation occurs and a number/index that indicates how many characters/nucleotides of the pattern attach to the left-part of the split strand. For example, the adjacent diagram shows a strand split by EcoRI. The pattern for EcoRI is “gaattc” and the index of the split is one indicating that the first nucleotide/character of the restriction enzyme adheres to the left part of the split.
In some experiments, and in the simulation you’ll run, another strand of DNA will be spliced into the separated strand. The strand spliced in matches the separated strand at each end as shown in the diagram below where the spliced-in strand matches with G on the left and AATTC on the right as you view the strands.
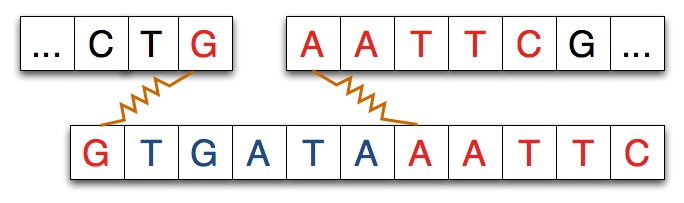
When the spliced-in strand joins the split strand we see a new, recombinant strand of DNA as shown below. The shaded areas indicate where the original strand was cleaved/cut by the restriction enzyme.

Your code will be a software simulation of this recombinant process: the restriction enzyme will cut a strand of DNA and new DNA will be spliced-in to to create a recombinant strand of DNA. In the simulation the code simply replaces every occurrence of the restriction enzyme with new genetic material/DNA — your code models the process with what is essentially string replacement.
Simulation of Restriction Enzymes
The code below finds all occurrences of a restriction enzyme like “gaattc” and splices in a new strand of DNA, represented by parameter splicee to create a recombinant strand. The strand spliceespliced-in replaces the enzyme. In the simulation the enzyme is removed each time it occurs/finds a binding site. The characters representing the enzyme are replaced by splicee. (This simulates the process of splitting the original DNA by the restriction enzyme, leaving sticky/blunt ends, and binding the new DNA to the split site. However, in the simulation the restriction enzyme is removed.)
This code is from the class SimpleStrand you’re given. The simulate DNA, which is instance variablemyInfo, is the target of a sequence of calls to indexOf that repeatedly searches for the next occurrence of the string parameter enzyme. As a special case, if the restrction enzyme is NOT found an empty strand is returned. In all cases the original strand is unchanged.
public IDnaStrand cutAndSplice(String enzyme, String splicee) {
    int pos = 0; // where enzyme found
    int start = 0; // where to start looking for enzyme
    StringBuilder search = myInfo;
    boolean first = true;
    SimpleStrand ret = null;
    while ((pos = search.indexOf(enzyme, pos)) >= 0) {
        if (first){
           ret = new SimpleStrand(search.substring(start, pos));
           first = false;
        } else {
           ret.append(search.substring(start, pos));
        }
        start = pos + enzyme.length(); // start next time after enzyme
        ret.append(splicee); pos++;
    }

    // check for last part of DNA, no enzyme in it, but use it
    if (start < search.length()) {
       if (ret == null){
           ret = new SimpleStrand(""); // no enzyme found
       } else {
           ret.append(search.substring(start)); // last bit of DNA
       }
    }
    return ret;
}
As the spliced-in strand splicee grows in size the code above will take longer to execute even with the same original strand of DNA and the same restriction enzyme. Creating the recombinant strand using the code above is an O(N) operation where N is the size of the resulting, recombinant strand (you have to justify this in your analysis.pdf). In making the O(N) claim we’re ignoring the time to find all the breaks, which is O(T) for a strand with T characters/nucleotides.
As part of this assignment you must develop an alternate implementation of DNA. Instead of using a simple StringBuilder to represent the DNA/enzymes, you’ll use a linked-list implementation that makes the complexity of the splicing independent of the size of the spliced-in strand. Each splice operation, simulated by the call to append above for SimpleStrand, should be O(1) rather than O(S)for a splicee strand with S characters/base-pairs. In your new implementation, the complexity ofcreating the recombinant strand will be O(B) where B is the number of breaks/splits created by the restriction enzyme. For a recombinant strand of size N where N >> B (>> means much bigger than) this is significantly more efficient both in time and (especially) memory. In making the O(B) claim we’re ignoring the time to find all the breaks, which is O(T) for a span with Tcharacters/nucleotides.
Benchmarking the Code
The code in the class DNABenchMark can be used to benchmark the cutAndSplice method. The code given to you will pop-up a file-dialog box — when run you can use this to navigate to either ecolimed.dat which is a smaller strand of DNA data or to ecoli.dat which is larger. Both are files in the data directory you download/snarf with Eclipse. You’ll probably need to create your own file of DNA, e.g., with a text-editor or by writing a program to create the file. You’ll need to do this as part of your benchmarking.For the class SimpleStrand.cutAndSplice you must show that the algorithm/code is O(N) where N is the size of the recombined strand returned. In your analysis file describe the results of the process and reasoning you use to demonstrate the O(N). You should have empirical results and timings that demonstrate the O(N) behavior. Graphing the data can be useful in showing behavior.
Benchmarking and Memory
You’ll notice that when the benchmarking program runs memory is exhausted in creating the recombinant DNA.You’ll need to determine on your machine the largest splicee string (the string spliced into the DNA strand) that works without generating a Java Out Of Memory error when run using a JVM configured with a -Xmx 512M heap-size (see below). The code you use in determining this largest string, given in DNABenchMark, should only use strings whose lengths are a power of two. Report this result in your analysis.pdf by providing the power-of-two string you can use without running out of memory with the input file ecoli.dat which has 645 cut points in an original strand of 4,639,221 base-pairs with the restriction enzyme EcoRI: “gaattc”.
Describe how you determined this result and how long your program takes on your machine to create the largest recombinant strand constructed using a splicee string whose length is a power of 2 before memory is an issue and your program crashes. If you double the size of the heap available to the Java runtime (-Xmx1024M) does your machine support the next power-of-two strand (i.e., the one that couldn’t run with -Xmx512M)? If so, how long does it take with ecoli.dat.
Be sure to report on running with consecutive powers of two for both -Xmx arguments and size-of-string. If your machine doesn’t support -Xmx512M start with 256M instead.
For example, here’s the output generated by running DNABenchMark on the data file ecoli.dat on my laptop.
dna length = 4,639,221
cutting at enzyme gaattc
-----
Class                splicee      recomb    time
-----
SimpleStrand:            256      4,800,471 0.127   # append calls = 1290
SimpleStrand:            512      4,965,591 0.127   # append calls = 1290
SimpleStrand:          1,024      5,295,831 0.102   # append calls = 1290
SimpleStrand:          2,048      5,956,311 0.123   # append calls = 1290
SimpleStrand:          4,096      7,277,271 0.117   # append calls = 1290
SimpleStrand:          8,192      9,919,191 0.104   # append calls = 1290
SimpleStrand:         16,384     15,203,031 0.180   # append calls = 1290
SimpleStrand:         32,768     25,770,711 0.314   # append calls = 1290
SimpleStrand:         65,536     46,906,071 0.588   # append calls = 1290
SimpleStrand:        131,072     89,176,791 1.029   # append calls = 1290
Exception in thread "main" java.lang.OutOfMemoryError: Java heap space
at java.util.Arrays.copyOf(Arrays.java:2882)
at
java.lang.AbstractStringBuilder.expandCapacity(AbstractStringBuilder.java:100)
at
java.lang.AbstractStringBuilder.append(AbstractStringBuilder.java:390)
at java.lang.StringBuilder.append(StringBuilder.java:119)
at SimpleStrand.append(SimpleStrand.java:111)
at SimpleStrand.cutAndSplice(SimpleStrand.java:46)
at DNABenchMark.strandSpliceBenchmark(DNABenchMark.java:56)
at DNABenchMark.main(DNABenchMark.java:95)
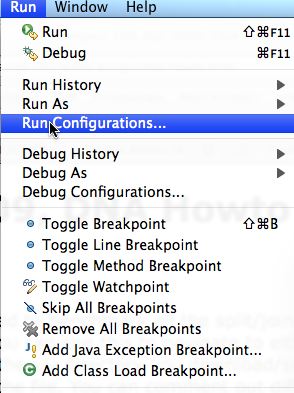
The benchmarking instructions say to increase the Java runtime heap size using the command-line argument -Xmx512M to start. (That was used in the run above). This sets the amount of memory available for allocating objects from the Java heap, which is the name used for the storage from which memory is allocated when your program runs.To specify initial heap size you must use the Eclipse Run Configurations … menu chosen from the Eclipse Run menu. A screen shot is shown on the left.
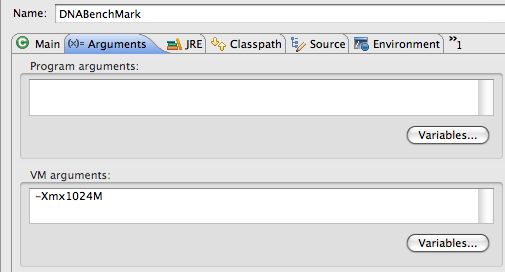
When this dialog opens, use the second tab of the dialog, labeled (x)=Arguments and then specify VM arguments in the second text box as shown in the screen shot on the right.
In using the dialogs shown, be sure to specify Apply and then Run to run with the designated heap size.If you can’t run with 512M because you don’t have enough memory, try256M, just be sure to document your runs in your analysis.pdf. You’ll need to run with several sizes, so if you can only support a max of 256M you might try another machine or go lower, e.g., to 128M.
LinkStrand Implementation Specifics
You’ll be developing/coding a class LinkStrand that implements a Java interface IDnaStrand. The class simulates cutting a strand of DNA by a restriction enzyme and appending/splicing-in a new strand.
You must use a linked-list to support the operations — specifically the class LinkStrand should maintain pointers to a linked list used to represent a strand. You should keep and maintain a pointer to the first Node of the linked list and to the last node of the linked list. These pointers are maintained as class invariants – the property of pointing to first/last nodes must hold after any method in the class executes (and thus before any method in the class executes). A Strand of DNA is initially representing by a linked list with one Node, the Node stores one string representing the entire strand of DNA. Thus initially the instance variables myFirst and myLast will point to the same node.
Here’s what part of the private state/instance variables of LinkStrand should look like:
public class Node {
    String info;
    Node next; \

    Node(String s){
        info = s;
        next = null;
    }
}

private Node myFirst, myLast; // first and last nodes of list
private long mySize; // # nucleotides in DNA
Every linked list representing DNA maintains pointers to the first and last nodes of the linked list. Initially, before any cuts/splices have been made, both myFirst and myLast point to the same node since there is only one node even if it contains thousands of characters representing DNA. The diagram below shows a list with at least two nodes in it. If any nodes are appended, the value ofmyLast must be updated to ensure that it correctly points to the last node of the new list.
The diagram below shows the results of cutting an original strand of DNA at three points and then splicing-in the strand “GTGATAATTC” at each of the locations at which the original strand was cut. Since splicing into a linked list is a constant-time, O(1) operation this implementation should be more efficient in time and space when compared to the String implementation.
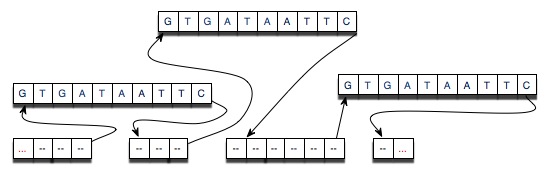
The diagram above shows conceptually how the linked list works. The diagram below gives a better indication as to why the operation of splicing in a new strand will be O(B) for cutting at B places: the string splicee is shared between all the nodes being spliced in. Creating the node is thus O(1) since the string splicee is already created.
Linked List Details
- You’ll need a nested/inner class to represent a Node of the linked list for storing genetic/DNA information.
- Implement both a constructor and
initializeFromusing the same code (either copied or re-use the common code in one method). When creating or initializing a newLinkStrandonly one node is created, the entire string representing the DNA is in one node. When initializing, be sure to initialize the length of the simulated strand as well. - Implementing
appendshould not concatenate strings, but can create new nodes. If you’re appending aLinkStrandyou should create new nodes, you should not conver the strand to a string. If you’re appending another kind of strand, e.g.,SimpleStrand, convert the strand to a string and append it — see the implementation inSimpleStrandfor details, especially in using the Java operatorinstanceof. - When you’re implementing
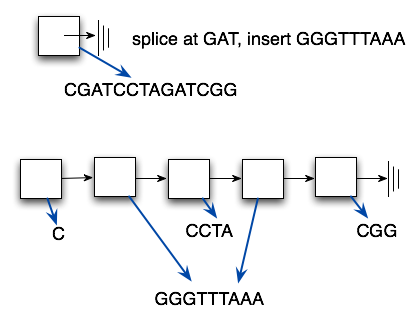
cutAndSpliceassume there’s only one node, though it might contain a huge string of DNA. If there’s more than one node you can throw an exception, e.g.,: if (myFirst.next != null){ throw new RuntimeException(“link strand has more than one node”); } - The code for implementing
cutAndSpliceshould be virtually identical to the code inSimpleStrandexcept that you’ll be creatingLinkStrandobjects and callingLinkStrand.appendin creating the recombinant strand.In this case virtually identical means you replaceSimpleStrandobjects withLinkStrandobjects. The code should then work.Don’t forget that as part of the code provided in this project we provide a classSimpleStrandthat implements theIDnaStrandinterface on which you can model your linked-list implementation.
LinkStrand Development
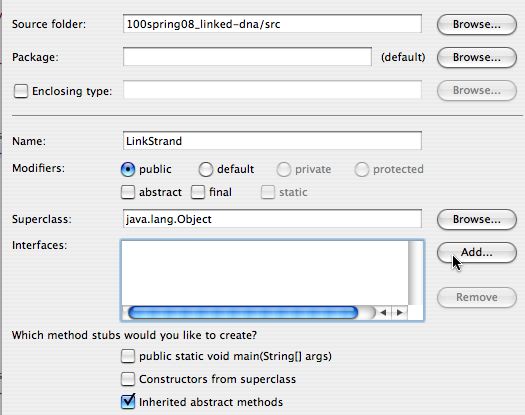
When you’re developing the newLinkStrand class that implements theIDnaStrand interface you should let Eclipse do the work of filling in stubs for the methods you must implement. On the left the dialog for specifying anew Java class is shown. On the right below is the dialog that Eclipse generates for specifying the interfaceIDnaStrand — this Dialog appears before Eclipse fills in the methods required to implement the interface.
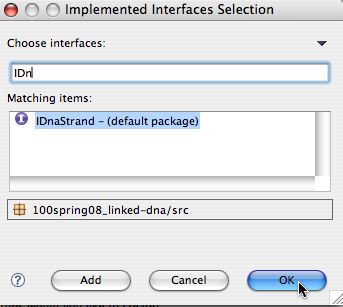
When creating a new Java class you first specify the name of the class as shown in the dialog on the left. You don’t need to change the super class, but you do need to specify that you’re going to add an Interface for the classLinkStrand to implement; note that the Add… button will be clicked.On the right below is the dialog box in which you enter the first few letters of the interface, in this case IDn and let Eclipse find the potential matches. Choose IDnaStrand in the default package and click OK.
Using JUnit
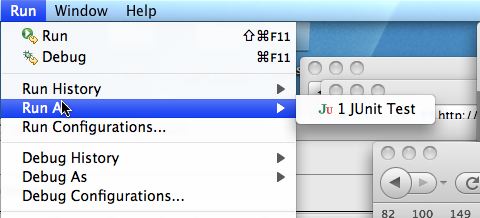
To test your LinkStrand class you’re given testing code. This code tests individual methods in your class, these tests are called unit tests and so you need to use the standard JUnitunit-testing library with theTestStrand.java file to test your Strand classes.To choose Run as JUnit test first use the Run As option in the Run menu as shown on the left. You have to select the JUnit option as shown on the right below. Most of you will have that as the only option—older versions of Eclipse have two “run as” options.
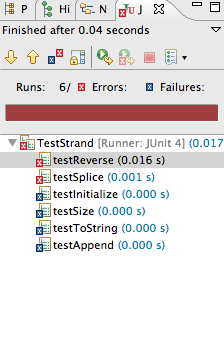
There are several tests in the TestStrand.java including tests of the strand’s length, toString,append and cutWith methods.
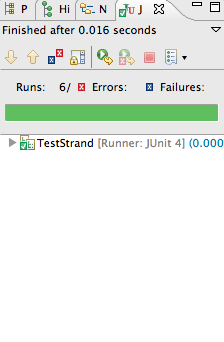
If the JUnit tests pass, you’ll get all green as shown on the left below. That screenshot was taken using the provided SimpleStrand class
Otherwise you’ll get red — on the right below — and an indication of the first test to fail. Fix that, go on to more tests. The red was obtained from a LinkStrand that had nothing but code-stubs generated by Eclipse. A constructor for LinkStrand was created so that the tests would run, the testing code in TestStrand creates a strand from a string in the method getNewStrand.
 |
 |
Passing these tests doesn’t guarantee full credit since the tests are about correctness, not about efficiency. Your code should avoid recalculating values that can be determined by other means. In particular the length of a LinkStrand strand should be calculated in O(1) time once the strand is created. Implementing LinkStrand is the bulk of the coding work for this assignment. You’ll need to implement every method and use the JUnit tests to help determine if your methods are correctly implemented.
- You must run virtual experiments to show that your linked-list implementation is O(B) for a strand with B breaks as described below. To use
LinkStrandin the benchmarking code, change the string"SimpleStrand" to "LinkStrand" in themainmethod of the classDNABenchMarkclass.You’ll need to make many runs to show this O(B) behavior, not just one. To start, note that there are 645 breaks for ecoli.dat when using EcoRI “gaattc” as the restriction enzyme. You can vary the number of breaks by constructing your own genomic data, or by re-using the string read from the data file ecoli.dat
Reversing DNA
In a genomic lab DNA doesn’t have a direction and in simulations it is often necessary to reverse a strand, e.g., change it from CGAT to TAGC. The SimpleStrand class uses the
StringBuilder.reversemethod to reverse the simulated strand – note that this method changes theStringBuiderobject it’s called on — it’s a mutator.In yourLinkStrandclass you can call.toString(), create aStringBuilder, and use.reverse()to create a single nodeLinkStrandobject. For full credit an N-node list should be reversed with an N-node list. For extra credit you should only reverse each unique string in the list once. This means, for example, that if a string/simulated strand of DNA has been spliced into aLinkStrandobject the string should only be reversed/represented once.